Thursday, January 7, 2010

Thursday Update!

It's been a long time! Too long, in fact!

So, without further ado, I bring you the bottle from last time, now in its completed state:


This bottle is a calm healing themed bottle. It contains pieces of amethyst, mint, lavender, and basil. I really like the way it turned out. For a more detailed description, view it in my store.

No featured store today. This is just a quickie update. Hope that you all had a wonderful Christmas and New Year holiday!

Sunday, September 27, 2009

Luck and Halloween

Working on a number of new bottles lately. I have a few done, but have only managed to take pictures of one so far. Thus, I allow you to feast your eyes upon my new "Luck" themed bottle.

From my store description: This tiny little bottle is filled with chamomile for luck, flax seed for protection, smoky quartz for calm, and calcite for wisdom. The outside of the bottle is decorated with a gold triquetra, which is the celtic symbol for luck and the trinity.

Here's a sneak-peak at another bottle I'm working on:I really like the way the design on the outside of the bottle has turned out for this one. Check back next time for the completed version!

In other news, The Geekery Guild on ArtFire is having a Halloween challenge this month. I am very happy to be taking part in this challenge, so expect some Halloween-themed-geekery items soon. The contest ends on October 21st, so I've got to have my items done before then!


On the Halloween challenge note, I decided to feature ArchaicSculpture, who is the first guild member to already submit an entry.

Not only was I intrigued by these Rainbow Blight Buttons for the interesting concept, but I was hooked when I read the maker's awesome description:

"After three years of trembling at the havoc my children would cause me….I have set them loose. My zombie children have awakened to Kill, Mame, Destroy, and Hiss at the corporate beasts selling us old ideas and recycled thoughts their grotesque laziness has resurrected the 80’s. As have I, yet my children are hungry for flesh their rotting corpses Lear mockingly at those idealess corporations of old. This generation will rise with the fallen and clutch at the thrones, claw their way to the strongholds, creativity will flow again as the rot of my children infects and corrupts those obscene Goliaths. I present my children……Rainbow Blight Buttons"

Saturday, September 12, 2009

Dying Crystals

After quite a long hiatus, I return. Recently getting back from a much-needed vacation has gotten me back on track and ready to get back into the swing of things.

Thus, I bring you one of my more recent experiments. Over the summer I visited a local crystal mine with my little brother and came home with a nice bucket full of crystals to play with.

One of the first things I wanted to do was to change the colors of some of them. All of the crystals from this mine are yellow-colored calcite crystals. But people dye quartz and other such crystals all the time. So why couldn't I? Needless to say, my experiment didn't work.

I first decided to try food coloring. Mind you, I didn't have very high hopes with the food coloring, but I decided to give it a shot anyway. So, I mixed some purple and pink coloring and put some of my crystals in it--then I let them dry for a good month. Today I finally decided to take them out. Just as I suspected! No go! As the food coloring came off, either by rubbing or water, I was left with still-yellow crystals.

A few of the crystals retained some coloring. Where there was a crack or fracture in the crystal, the coloring got into that and stayed. For those I'm currently soaking them in water.


I also tried heating the crystals with a heat gun. Rather than this helping or changing the color, it simply made the crystals even more fragile and broke them. So heat was a no-go as well. I'm guessing I'll need some sort of chemical dye in order to actually dye them. Any suggestions would be highly appreciated.

Although the experience did allow me to get a really neat shot with my camera:


Today's feature is A.A.E. Artglass, a store that I've been wanting to feature for a long time now. I generally love glass art anyway, but this artist is simply amazing and unique in what she does.

The images she puts onto the glass (like in the picture I present here) are simply fantastically done. Not only are they interesting to look at because of the glass work, but also these images that she somehow gets onto them. The images are so crisp and clear--as I look back through her gallery I'm wondering why I still haven't bought any of her fantastic work? Yet, I see that as I write this she no longer has any of the dragon-fly pendants I had previously fallen in love with. Nonetheless, I would happily take and proudly wear any of her other work as well.

Definitely a store to check out.

Thursday, June 11, 2009

Tales from Planet Z: Volume 1 Now on Sale!!

After much hard work, switching publishers, and pulling of hair, I am pleased to announce that Tales from Planet Z: Volume 1 is finally on sale!

To directly buy your copy of the book, either click on the picture of the cover, or go here: https://www.createspace.com/Customer/EStore.do?id=3385212

Or, visit the website and pick up some t-shirts too: TalesfromPlanetZ.com!

After our mess getting the book ready to go, I'll have more updates and creations soon!

Wednesday, May 13, 2009

New Designs

I've been working for a few weeks on a number of different bottle designs. I have finally finished two of them, though five more are still in progress. Yesterday I finally listed a set that I had finished. Thus, I present to you my newest designs for my Fairy Dust bottle set:

One of my viewers on SheezyArt noted to me that the first set I made didn't match up all that well. The forest and fire fairy bottles looked good together, but the other three didn't seem to fit. I agreed with her, and in fact it nagged at me so that I went ahead and redesigned the labels for all of them except the fire fairy dust bottle. I think they look much better now.

I listed each of the bottles singly and also as a set for a discounted price. You can buy the entire set of Fairy Dust Bottles for one price, essentially getting one bottle free! I also still have listed the older dust bottle designs, in case you liked those more.

I will be listing another new bottle either later today or tomorrow as well. I'll talk about that bottle in my next blog entry--I'm quite excited about it. It took a LOT of work to get this one done.

I also have some Artist Trading Cards in progress as well. One is completely finished, another is 98% finished, and all the others are in various stages of beginning and completion. However, I realized I haven't posted any of the previous ATCs I do have finished, so here are a couple:

These two kitty-loaf ATCs are done in primarily felt. Their mouths are hand-stitched. Both are available for trade if you're interested.


My feature today is Galaxy Glass Studios. Glass is a weakness of mine; I love the look of it. The vibrancy of the colors as the sun passes through them. How some glass can be translucent, and yet you can't see anything through it. I love it.

Galaxy Glass Studios really tempts me. Jerry and Laura (store owners and glass artists) create beautiful and unique pieces of jewelry out of glass. I was particularly drawn to a pair of green earrings. The two-tone color caught my eye, it helps that green is my favorite color, and the center is all sparkly. The way they are twisted makes them look so delicate and beautiful.

Jerry and Laura's store is also filled with other types of earrings and gorgeous pendants made of dichroic glass. You won't be dissapointed when you "step into" this store.

Tuesday, May 5, 2009

I'm Still Around

This is just a quick post to let everyone know that I am still around. I have been busy, and waiting on supplies to come in the mail. I'm currently only waiting on one more shipment.

I had a crazy weekend along with a horrible experience donating blood. Let's just say 45 minutes afterward I vomited and passed out, and they had to use smelling salts on me and it was horrible. I wanted to get some pictures taken and post a bottle yesterday, but I was still recuperating from my blood-donating experience Sunday. It's amazing how weak that can leave you.

The same night as my episode, my mother-in-law fell and hurt her knee badly. She now has stitches inside and staples outside and can't bend her knee for a full 10 days. She needs prayers for patience and healing; she HATES being confined.

Soon I will also be working on a redesign of my husband's website: Tales from Planet Z. He is almost ready to get started on issue 3! I'm so excited! I think everyone will just love it. More to come when we get a little farther into that.


Today's amazingly unique feature is a store I found on ArtFire called Spoon Bracelets. That's right; bracelets made out of spoons. Making bracelets out of spoons isn't my first thought when I think of a great way to recycle and re-purpose things. My first thought is something along the lines of "Oh, that sounds cheezy and kind of gross. Can't make for anything nice looking." Not only does this artist make spoon jewelry look good: it looks gorgeous! At first glance you would never say "That used to be a spoon!"


Looking through the shop, I also see that the artist makes spoon rings, too, though I'm still partial to the bracelets. Gorgeous jewelry and great conversation peices as well, one of these bracelets is definitely going on my wishlist.

Wednesday, April 22, 2009

Beach Bottle Beauty

I feel like having a beach theme today, perhaps because I like going to the beach so much, or because I recently made a beach-themed bottle pendant. Besides that, I like visiting the beach. It always amazes me just how BIG it is. You look out and the ocean is all you can see.

Meanwhile, the ocean is host to a whole other world! All of the different creatures living there, both teeny tiny and huge. Somehow they all survive.

When I was at the beach last (over Easter weekend) I made sure to pick up some sand and searched out some itty bitty shells that would fit into one of my bottles. Not an easy task! I also managed to find a couple of sea-urchin spines and pieces of sand dollar. They all make for a great bottle pendant:


Naturally, the bottle is for sale in my store: Oddments and Tweaks


In keeping with the beach theme of today's post, I did a search on ArtFire for the word "beach" and browsed until I found something that really caught my attention. In doing so, I came across Apple Blossom Designs 'Life's a Beach' charm.

This charm is really cute! I love the incorporation of the whole shell beads with teal crystals. It helps that one of my favorite types of shell is the spiral. I also really like the simplicity of the design, since many of the beach items I came across felt too cluttered.

Wednesday, April 15, 2009

Progress

As you probably noticed, I have taken the time to redesign my blog a bit. I liked the basic layout, but it needed to be more ME. I extended the content section. This may make some users have to scroll a little to see everything (not very much--I didn't extend it THAT far), but this allows for more room so that my pictures aren't constantly being cut-off. I also made the theme more green and put up a nice background picture with one of the symbols I use around my store.

Please let me know what you think.

Craftiness
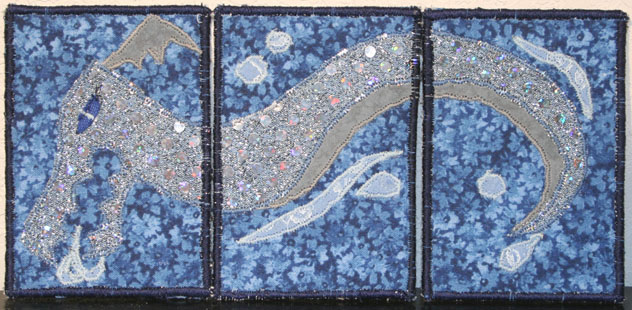
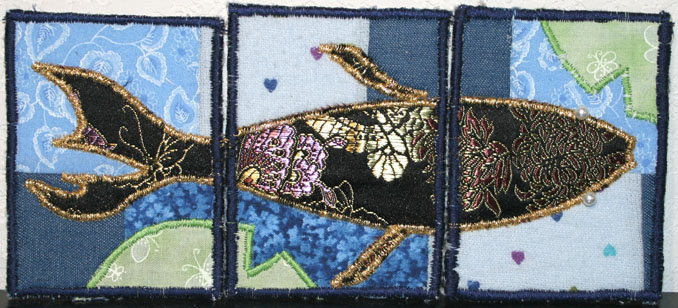
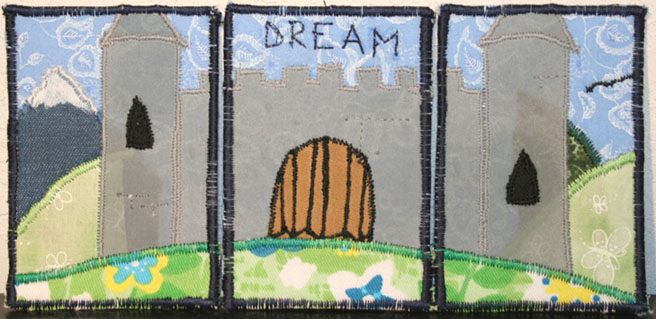
I have received all of the Fabric ATCs from the swap I was involved in, so I figured this would be a good time to show off the ones that I made for my partners. Though the swap only required me to send one to each partner, I got a little over-zealous and made a set of 3 ATCs for each partner.

"Water Dragon"


"Kimono Koi"


"Castle of Dreams"


Participating in this swap was a great experience, and on top of that it got me hooked on making these little ATCs. I already have a new set in progress for no apparent reason.

I've also been working on some new bottles. One has been in progress for a good month now, and another is nearly finished; I just need to do the wire-wrapping and 'bead' dangle I have planned for it. I'll give you one hint as to what its theme is: SeaWeed.


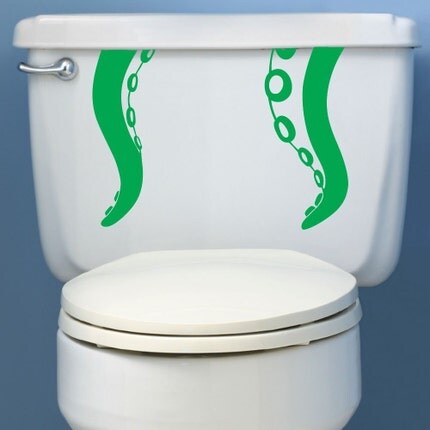
Today's feature is an interesting store on Etsy called Flush, please. Such a neat and funny idea, the store owners create decals for your toilet bowl! Imagine your guest's surprise when they walk into your bathroom to see that you are "steeping" some tea in your toilet bowl. Or perhaps you should add a sign to the bathroom door to "Beware" of your pet tentacle monster you keep in the toilet bowl.

These decals are even removable! So when you're tired of the old design and want to get rid of it, or update it to a new design, you can easily take it off and apply a new one!

The designs offered are simplistic but well done. You can also customize the color of your design. Perhaps you want your tentacle monster to be related to the devil, so RED tentacles would fit better. Not a problem!

These items are so unique and interesting, go take a look and perhaps spice up your dull bathroom a bit with these great toilet-bowl decals.

Sunday, April 12, 2009

Mustard seed bottles and changes


New Bottles
I have finally finished with the Fabric ATC swap I was a part of on Craftster.org. Now I'm just waiting to receive from my last partner. I'll post on another day with the ATCs that I sent and received from my talented partners. They've all been amazing!

Since I've had some free crafting time again (after my swaps and making Kippot for Passover), I've started work back on my bottles. I have several in progress still, but I managed to finish some of them yesterday.

Thus, I introduce some new scripture bottles.


Each of these three bottles have verses that mention the mustard seed, which Jesus uses in a few of his parables. Naturally, I have added some real mustard seeds inside the bottle to go along with the scroll verse!

There are three different mustard seed bottles, with the following verses: Luke 17:6, Matthew 17:20, and Matthew 13:31-32. I have to admit Matthew 13 is my personal favorite.


To see more of these bottles or to purchase, head on over to my ArtFire store: Oddments and Tweaks

Changes
You also might notice some changes to my blog. I'm currently working on a redesign, so please be patient with me until I get things settled down and to my liking.

Another Note
My sister is currently in the hospital dealing with some issues. If you're so inclined, she could certainly use any prayers you send her way.

Featured

Today's feature is the Etsy store uncorked. I could not find the artists name anywhere other than "a mad scientist mom." Despite that, she makes interesting and unique products. I especially like the cork necklace charms, which each come in it's own little test tube. She has some preset pictures and messages, as well as the opportunity to have your own custom photo and name or message on a cork.

So if you're looking for a unique set of jewelry that's also good for the environment, uncorked is a great place to go. If anything, take a browse through her store just to see all of the interesting images she has somehow put on these corks.
Add Image

Thursday, April 9, 2009

Making Kippahs (Yamakas) for Passover


Getting ready for Passover this year, my mother-in-law asked me to make some Kippahs (Yamakas) for some friends we invited. Thus began an interesting journey. First, I downloaded a pattern online--which didn't work at all. So then I started experimenting on my own based off of one Kippah I already had.

My first experiment turned out like a pyramid--not good at all. The second just... turned out weird. My third try on my own and I had it.

So first, I'll show off my failures:


Anyway, now it's after our Passover dinner, I'm sitting sipping wine, and I decided I would post a tutorial for others to make their own Kippah. I should also mention that this is my first tutorial I've ever posted.

First, you'll need the pattern. This is what I made/used. I tried to make the picture as to-size as possible, but included measurements anyway.


You will need to cut out 4 of these. I made my pattern a little off on one side, so it's best if you cut 2, then flip the pattern to cut the other 2. Be sure to cut them all on the same side of the fabric.

Now, depending on the type of fabric you are using, there is usually a right side and a wrong side.


Here in my picture, you can see I've colored the right side green, and the wrong side is still white. You'll want to take two of your pieces and put the right sides together. (I also suggest that you put the smaller sides together, as I mentioned earlier--my pattern is off a bit)

Sew up one side of it (the smaller side).


Now you can see we have a triangle piece two pieces thick with the right sides inside. You need to do the same thing with the other two pieces you have, again only sewing up one side.


Now, take both of your pieces and unfold them, and put the right sides together points upward. Next, sew across the side that used to be pointed. This is an odd part because you can't actually follow the edge of the fabric. Essentially, you want to sew the shape you want the kippah to be. Here's a picture after sewing so you can see what it looks like:


I like to start in the middle, sew to one end, then go back to the middle and sew to the other end. You can make it all one like if you'd like; whatever you're more comfortable with.

Tada! Now you have your very own Kippah!

Here's the inside of one of mine:

Now you can finish them in any way you'd like. One good thing to do would be a close zig-zag stitch over the seams to flatten them, and perhaps around the outside edge as well. If you'd like, you can make a second one and use it to line the first, so you have a nicely lined kippah.

I hope that I have explained clearly enough, and that this will be useful for someone!

Wednesday, March 25, 2009

Artist Trading Cards and techniques

So, I'm a member of craftster.org, and I've recently been introduced to Artist Trading Cards, or ATCs for short. I also joined a swap for fabric ATCs. Therefore, I've been doing a lot of research on different methods and techniques for making these, and trying some of it out.

One of the first interesting things I learned, was packing tape image transfers. You can take a picture, photo copy it (this only works with printers that use toner: such as a laserjet printer, or a copier machine), then put packing tape over the image. Smooth out the tape real well, then let the paper soak in water for about five minutes. Once it's done soaking, rub the paper off of the tape (I did mine under running water), and voila! You image is now on the tape!

I was pretty skeptical at first, but I tried it out, and what do you know? It worked perfectly! Take a look:


I also did some practice for the fabric ATCs I'm going to be swapping at the end of the month. I've never really used a zig-zag stitch for design or to around the edge of something to mimic a serge, so I wanted to try it out.

I ended up taking apart my sleeping mask, and decorating/experimenting with it. I used some pretty shiny material with a butterfly design on it, and cut out flowers from another material. Then I sewed around the flowers with a gold thread (horrible to work with!), using that zig-zag stitch. Took me a little bit to figure out the stitch length and distance, but I think it worked out pretty well. I also hand-added some little seed beads on the flowers to match. I cut out a piece of spare fleece I had and pined to the back, and sewed it all together using that zig-zag stitch around the edges. The original sleep mask is sandwiched in between the layers, and I also added new elastic straps. I really like the way it turned out.


Featured

Today's feature, is LeastLikely2Breed. I found this store a while back on Etsy, and immediately added it to my favorite sellers. What makes Leigh's products so unique is her labels, descriptions, and naming. For instance, 'Roid Rage' is one of my personal favorites. Here is an exert from her description:

"Oh come on, when you push out 7lbs plus of baby you're gonna get some hemmies. Instead of sheepishly trying to hide your remedy behind other, more socially acceptable toiletries in the bathroom cabinet, why not display your tin of Roid Rage prominently and within easy reach? It smartly says to all your spying guests, 'I have hemorrhoids -- so what.'"

Her shop is filled with all manner of these same types of products, from "Keep Calm and Carry On" lip balm to "Bad Ass Booty Balm" for diaper rash. Buy them because they're good products with natural ingredients, or for a novelty gift for friends. Either way, I'm sure you'll be pleased with her professional-looking labeling and the product itself.

Thursday, March 19, 2009

More Products!

I have made some more Legend of Zelda Potion Bottle Pendants and listed them for sale in my ArtFire store.


If you're interested, check out my ArtFire store at OddmentsandTweaks.artfire.com

I'm also working on a few new bottles. One of them is book-themed. However, I can't finish them until I get another supply that I need. With a few more sales I'll have the money to get what I need and finish the new bottles. I'm excited to finish them and see what kinds of reactions I get.


Featured

From now on, I'm going to feature at least one other shop/person on each blog, or every-other blog entry.

Today's Feature is Fizzy Bubbles from ArtFire.

My Poop Don't Stink Fizzy Bubble's store is filled with unique great looking soaps! One that really caught my eye was the "My Poop Don't Stink" soap, which is ironically rose scented.

This shop is filled with all kinds of interesting soaps, such as animal-cracker shaped soap and jelly bean soap, just to name a couple. It's a great stop for novelty soaps, bath bombs, and more!

Monday, February 23, 2009

Costumes

Matt and I went to Megacon '09 this year and it was so much fun!! I wanted to show off the costumes I made for the two of us to wear.


Our first costumes were shy guys from the Super Mario Brothers game series. The robes were pretty easy to make; I got a robe costume pattern and modified the arms and added a pocket into the side. I also added a panel of thin black fabric inside the hood so that our faces were not visible. The masks and belt buckles were the most difficult parts.


The masks are made of paper mache, which has been painted white, and an elastic strip attached to either side. The belt buckles I made out of clay, then painted. They are attached on the belts (which were cheap GoodWill store finds) by elastic loops.


Our second costumes (which we wore on Saturday) were Doki and Nabi from the There She Is cartoons. If you haven't already watched them, be sure to stop by sambakza.net and take a look!


These costumes were a bit more difficult. I bought the hats pre-made from a website, then took them apart and put them back together to make the inside ears white instead of the pink that they came as. The bunny ears had to be rigged to make them stand up properly (with the help of two wire hangers, a head band, two hair combs and epoxy clay). The cat ears had three black stripes painted on with fabric paint. The sweaters and pants and skirt all came from GoodWill finds. I altered the skirt a bit and added the pink collar to the sweater myself. I found green fabric and made the scarf myself. Shoes and tights were bought at Walmart, and we used professional clown makeup to whiten our faces.


I also made a purse to match and carry around things while at the con.